Every
week Stampin’ Up! has a newsletter for demonstrators which gives samples for us
to use to inspire our customers. This
past week’s samples were based on using limited supplies. Each card uses the same supplies and
measurements. The supplies are as
follows:
Cardstock: Two pieces (a color that coordinates with the
Designer Series Paper use); one cut to 8 1/2 “ x 5 ½” and scored at 4 ¼” and
one cut to ¾” x 4”
Whisper
White - one piece cut to 3 ¾” x 4”
Designer Series Paper: one piece cut to 2” x
5 ½”
Listed
below each photo are the supplies I used along with any inks, accessories, etc.
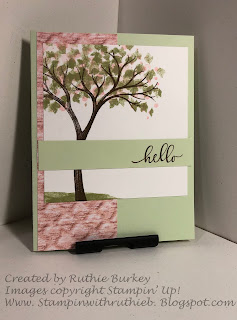
Hello Card
Supplies:
Stamps: Life is Beautiful
Inks: Soft Suede, Pear
Pizzazz, Blushing Bride
Color of Cardstock
used: Soft Seafoam
Designer Series Paper
used: In Good Taste
Accessories: Adhesive of choice
Directions:
Use
Soft Suede ink to stamp the large tree onto the left side of the 3 ¾” x 4”
piece of cardstock. Use Pear Pizzazz ink to stamp the leaf images onto the tree
and the ground at the bottom of the tree.
Use the Blushing Bride ink to stamp the “bokeh” dots image over the
leaves imitating blossoms on the tree.
Use Soft Suede ink to stamp the sentiment onto the ¾” x 4” piece of Soft
Seafoam cardstock. Adhere the 2” x 5 ½”
piece of Designer Series Paper about ¼” from the left side of the card
front. Adhere the 3 ¾” x 4” stamped
piece over that leaving about ¼” from the right hand side of the card. Adhere the ¾” x 4” piece across the image
about ¾” from the bottom of the image.
(If desired you can use an additional piece of 4” x 5 ¼” Whisper White
on the inside of the card).
Birthday “Fishes” Card
Stamps: Whale Done
Inks: Night of Navy
Color of Cardstock
used: Balmy Blue
Designer Series Paper
used: Whale of a Time
Accessories: Adhesive of choice, Seabed 3D Embossing Folder,
Whale Builder Punch, Stampin’ Dimensionals
Directions:
Use
the Whale Builder Punch to punch a Whale from the Designer Series Paper. Use the back side of the paper to punch the “spout”
water. Use the Seabed 3D Embossing
Folder to emboss the 3 ¾” x 4” piece of Whisper White. Use Night of Navy ink to stamp the “birthday
fishes” sentiment on the right side of the ¾” x 4” piece of Balmy Blue
cardstock. Use Night of Navy ink to
repeatedly stamp the school of fishes image onto the left side of the ¾” x 4”
piece of Balmy Blue cardstock ending right before the sentiment. Adhere the 2” x 5 ½” piece of Designer Series
Paper about ¼” from the left side of the card front. Adhere the embossed piece of Whisper White
onto the card front leaving about ¼” from the right side. Adhere the ¾” x 4” piece of Balmy Blue to the
card front about ¾” from the bottom of the embossed piece. Adhere the whale to the embossed piece using
Stampin’ Dimensionals and then adhere the “spout” water above the Whale. (If desired you can use an additional piece
of 4” x 5 ¼” Whisper White on the inside of the card).
I
hope you enjoyed seeing how limited supplies can be used for different looks in
card making. You can see a video of the
creation of these cards on the Facebook Live recording from October 25th
HERE
See
you next Sunday (November 1st) at 2pm on my Facebook Live!


No comments:
Post a Comment
Thank you for leaving comments, they are greatly appreciated!