Tuesday, October 27, 2020

Life is Beautiful and Whale Done


Every week Stampin’ Up! has a newsletter for demonstrators which gives samples for us to use to inspire our customers.  This past week’s samples were based on using limited supplies.  Each card uses the same supplies and measurements.  The supplies are as follows:


Cardstock:  Two pieces (a color that coordinates with the Designer Series Paper use); one cut to 8 1/2 “ x 5 ½” and scored at 4 ¼” and one cut to ¾” x 4”
Whisper White - one piece cut to 3 ¾” x 4”
Designer Series Paper: one piece cut to 2” x 5 ½”
 
Listed below each photo are the supplies I used along with any inks, accessories, etc.
 
 
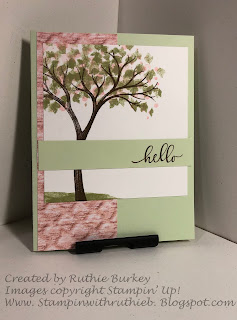
Hello Card
 
Supplies:
 
Stamps: Life is Beautiful
Inks: Soft Suede, Pear Pizzazz, Blushing Bride
Color of Cardstock used:  Soft Seafoam
Designer Series Paper used:  In Good Taste
Accessories:  Adhesive of choice
 
Directions:

 Use Soft Suede ink to stamp the large tree onto the left side of the 3 ¾” x 4” piece of cardstock. Use Pear Pizzazz ink to stamp the leaf images onto the tree and the ground at the bottom of the tree.  Use the Blushing Bride ink to stamp the “bokeh” dots image over the leaves imitating blossoms on the tree.  Use Soft Suede ink to stamp the sentiment onto the ¾” x 4” piece of Soft Seafoam cardstock.  Adhere the 2” x 5 ½” piece of Designer Series Paper about ¼” from the left side of the card front.  Adhere the 3 ¾” x 4” stamped piece over that leaving about ¼” from the right hand side of the card.  Adhere the ¾” x 4” piece across the image about ¾” from the bottom of the image.  (If desired you can use an additional piece of 4” x 5 ¼” Whisper White on the inside of the card).


Birthday “Fishes” Card


Stamps: Whale Done
Inks:  Night of Navy
Color of Cardstock used:  Balmy Blue
Designer Series Paper used:  Whale of a Time
Accessories:  Adhesive of choice, Seabed 3D Embossing Folder, Whale Builder Punch, Stampin’ Dimensionals
 
Directions:

Use the Whale Builder Punch to punch a Whale from the Designer Series Paper.  Use the back side of the paper to punch the “spout” water.  Use the Seabed 3D Embossing Folder to emboss the 3 ¾” x 4” piece of Whisper White.  Use Night of Navy ink to stamp the “birthday fishes” sentiment on the right side of the ¾” x 4” piece of Balmy Blue cardstock.  Use Night of Navy ink to repeatedly stamp the school of fishes image onto the left side of the ¾” x 4” piece of Balmy Blue cardstock ending right before the sentiment.  Adhere the 2” x 5 ½” piece of Designer Series Paper about ¼” from the left side of the card front.  Adhere the embossed piece of Whisper White onto the card front leaving about ¼” from the right side.  Adhere the ¾” x 4” piece of Balmy Blue to the card front about ¾” from the bottom of the embossed piece.  Adhere the whale to the embossed piece using Stampin’ Dimensionals and then adhere the “spout” water above the Whale.  (If desired you can use an additional piece of 4” x 5 ¼” Whisper White on the inside of the card).

 I hope you enjoyed seeing how limited supplies can be used for different looks in card making.  You can see a video of the creation of these cards on the Facebook Live recording from October 25th HERE


See you next Sunday (November 1st) at 2pm on my Facebook Live!

Sunday, October 18, 2020

Winter Woods and Beautiful Autum

 Okay, y'all don't faint.  I actually have the directions for today's Facebook Live up on the SAME DAY!!!  LOL!!!  I had fun making today's cards and I hope you enjoy them as well.  Remember, if you want to order any of these products, just click the "Shop Now" button.  Be sure to use October's Host Code: WNTVRB7Q if your order is under $150 (if it's over $150 be sure to take advantage of the Host Rewards Stampin' Up! offers).  Also, I am only $400 away from by $200,000 career sales!!!!!!  Thank you to everyone who has ordered!  I'm hoping to hit the goal by the end of October.

Winter Woods Card


Supplies:
 
Stamps: Winter Woods
Inks: Mossy Meadow, Early Espresso
Cardstock:  Mossy Meadow – three pieces; one piece cut to 8 ½” x 5 ½” and scored at 4 ¼”, One piece cut to 3 1/3” x 1 ¼” and one piece cut to 4” x 5 ¼”
Early Espresso – two pieces; one piece cut to 4 1/8” x 5 3/8” and one piece cut to 3 5/8” x 1 ½”
Very Vanilla – two pieces bot cut to 4: x 5 ¼”
Accessories:  Banner Punch, In The Woods dies, Evergreen Forest 3D Embossing Folder, Mossy Meadow Diagonal Stripe Ribbon, Brayer, Stampin’ Dimensionals, Mini Glue Dots
 

Directions:


Use Evergreen Forest 3D Embossing Folder to emboss one of the 4” x 5 ¼” Very Vanilla cardstock pieces.  Ink the brayer with Mossy Meadow ink and apply to the embossed piece.  Continue inking until you reach the desired shade. Adhere this piece to the 4 1/8” x 5 3/8” piece of Early Espresso cardstock.  Cut a 10” piece of Mossy Meadow Diagonal Strip Ribbon.  Tie a knot using the ends.  This creates a loop of the ribbon.  Cut the loop and wrap the knotted ribbon around the embossed piece and secure the ends on the back using regular tape. Use a Mini Glue Dot to hold the knot in place if desired.  (se photo for placement of knot).  Adhere this piece to the card front.  Use the Banner Punch to punch the ends of the 3 ½” x 1 ¼” Mossy Meadow cardstock and the 3 5/8” x 1 ½” piece of Early Espresso cardstock.   Stamp the sentiment onto the punched Mossy Meadow cardstock piece, positioning toward the right side of the banner.  Adhere the Early Espresso banner to the card front, slipping it under the ribbon.  Use Stampin’ Dimensionals to adhere the Mossy Meadow banner over the Early Espresso banner (see photo). Use Mossy Meadow ink to stamp the fir tree image from the Winter Woods set onto the 4” x 5 ¼” piece of Mossy Meadow cardstock. Die cut using the coordinating die from the In The Woods dies. Ahdere the die cut fir tree to the card front.  For the inside of the card, cut a 4 ½” piece of the Mossy Meadow Diagonal Stripe Ribbon and place along the bottom edge of the remaining 4” x 5 ¼” piece of Very Vanilla cardstock.  Trim the ribbon flush with the sides of the cardstock and then adhere to the inside of the card base.


Have a Beautiful Day Card

(Thank you to Sue Erickson for teaching me this technique)


Stamps: Beautiful Autumn
Inks:  Early Espresso
Stampin’ Blends:  Dark Crumb Cake (optional)
Cardstock: Cajun Craze – one piece cut to 8 ½” x 5 ½” and scored at 4 ¼”
Crumb Cake – one piece cut to 4” x 5 ¼”
Very Vanilla – one piece cut to 4” x 5 ¼”
Gold Foil – one scrap for cutting a circle
 
Designer Series Paper (DSP): Gilded Autumn – three pieces; one cut to 4” x 5 ¼”, one cut to ¾” x 4” and one cut to ¼” x 4” plus scraps for cutting four circles (refer to photo for patterns used)
Accessories: Layering Circles dies and Foam Adhesive strips
 

Directions:

 
Adhere the ¾” x 4” piece of DSP to the bottom of the 4” x 5 ¼” piece of Crumb Cake cardstock and adhere this piece to the inside of the card base.  Adhere the 4” x 5 ¼” piece of DSP to the card front. Use the following diameters of circles from the Layering Circle Dies to cut the DSP and the Gold Foil cardstock: 2 3/8”, 2 1/8”, 1 7/8”, 1 5/8” (this is the one used to cut the Gold Foil Cardstock) and 1 3/8”.  (see photo for patterns used).  After all circles are cut, cut each circle in half.  Use adhesive to adhere the  half-circle pieces together using the photo as a guide.  Use Early Espresso to stamp the sentiment onto the ¼” x 4” piece of DSP.  Adhere the half-circle pieces to the cardfront aligning them as show in the photo and leaving room for the sentiment.  Cut a 3 ¾: piece of Foam Adhesive strip. (I did not care for the foam being so stark white so I colored the non-adhesive sides of the strips with the Dark Crumb Cake Blend marker.  This is totally optional though).  Apply the Foam Adhesive strip to the back of the ¼” x 4” piece of DSP containing the sentiment and place on the card front between the two half-circle pieces.

Saturday, October 17, 2020

Little Treats Bundle featured on October 11th Facebook Live

 So sorry it has taken so long for me to post the instructions from October 11th's Facebook Live.  My computer is having issues and needs to go visit the Geek Squad!  So withouth further ado, here are the instructions!

Happy Birthday Hinge Step Card


Supplies:
 
Stamps: Little Treats
Inks: Calypso Coral, Crushed Curry, Coastal Cabana, Misty Moonlight
Cardstock:  Calypso Coral – one piece cut to 8 ½” x 5 ½” and scored at 4 ¼” for card base
Whisper White – three pieces, one cut to 2” x 5” and one cut to 4” x 5 ¼” and a scrap big enough to accommodate the larger label die from the Little Treat Box dies.
Coastal Cabana – one piece cut to 2 1/8” x 5 1/8”
Designer Series Paper (DSP): Playing with Patterns – three pieces; one 6” x 6” for the die cut, one piece cut to 4: x 5 ¼” and one cut to ¾” x 4” (see photo for patterns used)
Accessories:  Little Treat Box dies, Polka Dot Tulle Ribbon, Playing with Patterns Resin Dots, Stamparatus, Stampin’ Dimensionals
 
Directions:
 

Use the Little Treat Box dies to cut a treat box from the 6” x 6” DSP.  Cut the two pieces containing the scalloped edges away for the box (save the scraps for another project).  Place one of the scalloped edge pieces in the trimmer with the top of the scalloped edge at the 1” mark and score. Repeat with the other scalloped edge piece. Set these pieces aside.   Cut a 13” length of the Polka Dot Tulle Ribbon and dye it Calypso Coral by holding it to the Calypso Coral pad with a paper town and then dragging the ribbon through the ink.  You may have to do this several times to get the desired depth of color.  Place the ribbon aside to dry and carefully clean your hads so as not to get the ink all over your project.  Place the 2” x 5” piece of Whisper White cardstock into the Stamparatus with the 2” length along the top and lining up the 5” length on the left side of the Stamparatus..  Secure the piece in place with a magnet.  Place the uninked Banner image from the Little Treats set on the top portion of the cardstock leaving about ¼” from the top of the piece.  Close the Stamparatus plate and pick up the stamp.  Ink the stamp with Calypso Coral image and close the plate so the image stamps onto the cardstock.  After stamping, clean the image and lift the plate from the Stamparatus base and move it down one “notch”. Ink the stamp with Crushed Curry and stamp again.  This image should now be about ¾” of an inch below your first stamped image.  After stamping, clean the stamp, lift the plate from the Stamparatus and this time move it down two more notches (this will leave room for the sentiment).  Ink the stamp with Coastal Cabana and stamp.  After stamping, clean the stamp, lift the plate from the Stamparatus and move down one notch.  Ink the stamp with Misty Moonlight and stamp.   Remove your stamped piece from the Stamparatus and set the Stamparatus aside.  Ink the “Birthday Wishes” stamp with Calypso Coral ink and stamp it onto the Whisper White scrap.  Cut the sentiment out using the large label die from the Little Treat Box dies, lining the sentiment up with the top of the die instead of centering (this will leave room for the resin dots.  Adhere the die cut sentiment to the center of the stamped panel using Stampin’ Dimensionals.  Adhere the stamped panel to the 2 1/8” x 5 1/8” piece of Coastal Cabana cardstock.  Place one of the scalloped edge pieces previously cut from the Little Treat Box die so that the 1” score line lines up with the right edge of the cardstock and centering it with the sentiment (see photo for help on placement)  Secure this piece to the cardstock and trim on the left hand side if needed.  Adhere the 4” x 5 ¼” piece of Playing with patterns onto the card front.  Adhere the stamped panel to the left side of the card front leaving about a 1/8” border.  Fold the remaining scalloped edge piece along the 1” score line.  Place adhesive on the portion of the piece below the score line.  Line the piece up with the scalloped edge on the card front and then close the card, securing the piece to the back of the inside of the card.  (See photo for placement).  Adhere the ¾” x 4” piece of DSP to the 4” x 5 ¼” piece of Whisper White cardstock.  Adhere this piece to the inside of the card (it will cover the part of the die cut that is not scalloped.  Close the card, thread the ribbon through the holes in both of the scalloped pieces and tie the card shut.  For the finishing touch, place three of the Coastal Cabana colored Playing with Patterns Resin dots below the sentiment.


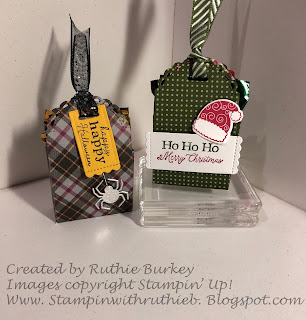
If desired cut another treat box and decorate as shown as a matching gift to the card.


Primitive Tree Card and Matching Treat Box


Supplies:
Cardstock: Pretty Peacock – Three pieces; one cut to 8 ½” x 5 ½” and scored at 4 ¼”, one cut to 3” x 5 ¼” and one scrap large enough to cut one of the scalloped edge pieces from the Little Treat Box dies.
Very Vanilla – one piece cut to 4” x 5 ¼”
Shaded Spruce – one piece cut to 3 ¼” x 5 ¼” ( this piece could be crumb cake if desired)
Early Espresso – one piece cut to ¾” x 3 ¾” and scored at 3/8” on the long side.
Designer Series Paper (DSP): Plaid Tidings - three pieces all from the same pattern; one piece left at 6” x 6”, one piece cut to 4” x 5 ¼” and one piece cut to ¾” x 4”
Accessories: Pine Tree punch, Braided Linen Trim
 
Directions:


Use the Little Treat Box dies to cut a box from the 6” x 6” piece of DSP (save the scraps!) and to cut one of the scalloped edge sections from the scrap of Pretty Peacock cardstock.  Assemble the Treat Box.  Use the Pine Tree Punch to punch a tree in the center of the Pretty Peacock piece that was cut from the die.  Trim the scalloped edge from the Pretty Peacock piece and adhere it to the front of the Treat Box (the pattern will show through the punched image.  Tie the treat box closed using the Braided Linen Trim.   From the scraps of leftover DSP cut out the two large and two small rectangles.  Adhere these triangles to the ¾” x 3 ¾” piece of Early Espresso using the score line to center the pieces.  The two larger triangles will be the bottom of the tree and the two smaller triangles will be the top of the tree.  Adhere the assembled tree to the 3” x 5 ¼” piece of Pretty Peacock cardstock.  Adhere this panel to the 3 ¼” x 5 ¼” piece of Shaded Spruce cardstock.  Adhere the 4” x 5 ¼” piece of DSP to the card front and then center the panel onto the card front.  Adhere the ¾” x 4” piece of DSP to the 4” x 5 ¼”  piece of Very Vanilla cardstock and adhere to the inside of the card.

Here are two other treat boxes I made during the Facebook Live (they really don't need any directions)


I hope to see you tomorrow!!!!


Tuesday, October 6, 2020

Flights of Fancy featured on Facebook Live Sunday, October 4th

 The images in the Flights of Fancy set are just adorable.  I did two fancy fold cards with two of the images.  I really enjoy doing fancy folds and I hope you do too!

Little Witch Card


Supplies:
 
Stamps: Flight of Fancy
Inks: Memento Tuxedo Black, Crushed Curry, Blackberry Bliss, Cajun Craze
Stampin’ Blends: Light Blackberry Bliss, Dark Mango Melody, Light Granny Apple Green, Light Smoky Slate, Light and Dark Crumb Cake
Cardstock:  Blackberry Bliss – one piece cut to 11’ x 4 1’4” and scored at 4 ¼” and 8 ½”
Whisper White – two pieces; one cut to 4” x 4” and one cut to 2 ¼” x 4”
Crushed Curry – one scrap large enough to accommodate a 2” punch
Designer Series Paper (DSP): Plaid Tidings – one piece of the white plaid cut to  2 ¼” x 4”
Accessories:  2” Circle Punch, Autumn Punch Pack, Brayer, Stampin’ Sponges, Stampin’ Dauber, Rhinestone, Wink of Stella, Rhinestones
 
Directions:
 

Place the 11” x 4 ¼ piece of cardstock where the 4 ¼” side is at the top and the 8 ½” score line is at the top as well.   Slide the 2” circle punch onto the cardstock about ¼” from the left-hand side and center the score line at the 8 ½” mark in the punch and punch a circle. Fold the up the bottom of the card to the 8 ½” score line.  With the top portion of the card open, adhere punched circle to the back of the 4 ¼” x 4 ¼” portion of the card.  Punch a 2” circle from the Crushed Curry Cardstock.  Use Stampin’ Sponges to sponge Crushed Curry and Cajun Craze ink around the outer edge of the circle.  Use the dauber to lightly add some Cajun Craze on the right side of the circle.  Ink the small “sparkle” stamp with Crushed Curry and stamp on the right side of the circle to mimic craters on the moon.  Adhere this piece to the front side of the 4 ¼” x 4 ¼” portion of the card base matching it to the Blackberry Bliss Circle ( the top of the 4 ¼” x 4 ¼” layer will be sandwiched between the two circles).  Fold the top of the card down over the 4 ¼” x 4 ¼” square potion.  Temporarily adhere the 2 ¼” x 4” piece of Whisper White to the front of the top layer (this is have half of the punch on the left side).  Open the card and use the 2” punch to punch through the Whisper White layer.  Remove the now punched Whisper White layer from the card front.  Place a piece of regular tape over the moon on the Witch stamp. Ink the stamp with Memento Ink and then remove the tape, this will “omit” the half moon on the Witch image.  Stamp the image onto the Whisper White being careful not to let any portion of the stamp fall into the punched area.  Color the image using the following Blends:  Dark Mango Melody for the Stars and Moons on her dress and the sparkles on her wand and the vapor trail of her broom, Light Blackberry Bliss for her hat and dress, Light Granny Apple Green for her face and hands, Light Smoky Slate for the mouse, Light Crumb Cake for the straw of the broom and Dark Crumb Cake for the handle of the broom.  Place a rhinestone in the center of each “sparkle” and use Wink of Stella to accent the stars and moons on her hat and dress and the vapor trail of her broom. Adhere this layer to the top front of the card.  Use the brayer to apply Blackberry Bliss ink to the 2 ¼” x 4” piece of black and white Designer Series Paper.  Adhere this piece to the bottom front of the 4 ¼” x 4 ¼” section of the card base. 


Little Angel Card


Stamps: Flights of Fancy
Inks: Memento Tuxedo Black
Stampin’ Blends: Light Old Olive, Light Poppy Parade, Light Misty Moonlight, Dark So Saffron, Ivory
Cardstock: Misty Moonlight– two pieces; one cut to 8 ¼” x 5 ½”” and scored at 5 ½’  for card base and one cut to 2 ½” x 8”
Whisper White – two pieces cut to 2 ¼” x 3 ¾”
Designer Series Paper (DSP): Trimming the Town: one piece cut to 4” x 5 ¼” and one cut to 2 ½”x 4”.  Sentiments cut from the piece of Designer Series Paper that has all the sentiments and houses cut from the Designer Series Paper that has the small houses. SEE PHOTO FOR PATTERNS USED
Accessories: Adhesive Backed Snowflakes, Pearls, Wink of Stella and  Stampin’ Dimensionals.
 
Directions:
 

Use Memento ink to stamp the Angel stamp onto one of the 2 ¼” x 4” pieces of Whisper White Cardstock.  Use Stampin’ Blends to color the Angel as follows: Dark So Saffron for her hair, Ivory for her face, hands and feet, Misty Moonlight for the top of her dress and for the section of the dress that has the circles, Light Old Olive and Poppy Parade for the triangle sections.  Place Adhesive Backed Snowflakes over the snowflakes in the image.  Cut five small house (see photo for the ones I used) and adhere over the stamped houses popping one on each side up with Stampin’ Dimensionals.  Fold the 2 ½” x 8” piece of Misty Moonlight cardstock at the 4” score line.  Adhere the stamped image to the front of this piece being sure the fold is on the right-hand side.  Open the piece and adhere the other 2 ¼” x 3 ¾” piece of cardstock, again being sure the fold is on the right-hand side. Adhere the 4” x 5 ¼” piece of Designer Series Paper to the card base being sure the score line is on the left side.  Close the card along the score line and adhere the 2 ½” x 4” piece of Designer Series Paper.  Open the card and adhere the folded piece of cardstock containing the stamped image to the center of the section with the 4” x 5 ¼” piece of Designer Series Paper.  Be sure the fold is on the right-hand side.  See the photo for placement and how the card looks when closed. Adhere the selected sentiment to the bottom right hand portion of the card.

I hope you have a wonderful week and look forward to seeing you next week!  Remember:  Send out the cards you make, I'm sure they will brighten someone's day!


Monday, October 5, 2020

 WORLD CARD MAKING DAY
SATURDAY, OCTOBER 3RD

Four cards from One Sketch, One Stamp Set, One Punch, One pack Designer Series Paper plus some assorted coordinating cardstock


I had such fun with the projects for World Cardmaking Day!!!!  I showed how to use one sketch to create four cards.  Here are the four cards:


Here's the Sketch:


Supplies:
 
Stamps: Festive Post
Inks: Memento Tuxedo Black Inkc
Cardstock:  Card bases – four pieces cut to 8 ½” x 5 ½” and scored at 4 ¼”.
Card layerayered at 4 1/4ted coordinating – four pieces which coordinate with the Designer Series Paper chosen cut to 4” x 5 ¼”
Cardstock for layering with the Designer Series Paper:  Eight pieces (two for each card) cut to 1 1/8” x 4” and eight pieces (two for each card) cut to 1 1/8” x 3 ¾”
Whisper White - four pieces 2 ½” x 3” for focal image and four pieces cut to 4” x 5 ¼”
Designer Series Paper (DSP): Plaid Tidings –Eight pieces (two for each card) cut to 1” x 3 7/8”, eight pieces (two for each card) cut to 1” x 2 5/8” and one piece cut to ¾” x 4”
 
SEE PHOTO FOR PATTERNS USED AND REFER TO DESIGNER SERIES PACKAGING FOR COORDINATING COLORS
 
Accessories:  Rectangular Postage Stamp Punch, 3/8” Metallic Edge Ribbon (Silver), Stampin’ Dimensionals, Mini Glue Dots

DIRECTIONS FOR EACH CARD:

Adhere the two pieces of 1” x 3 7/8” Designer Series Paper to the two pieces of 1 1/8” x 4” cardstock and adhere the two pieces of 1” x 2 5/8” pieces of Designer Series Paper to two pieces of 1 1/8” x 2 ¾” cardstock.  Adhere these pieces to the 4” x 5 ¼” cardstock layer following the layout of the sketch. Adhere this piece to the card base.  Stamp the image for the focal point onto the 2 ½” x 3 ½” piece of Whisper White cardstock.  Punch out the image with the Rectangular Postage Stamp Punch and adhere to the card front (see sketch for placement) using Stampin’ Dimensionals.  Tie a bow with the ribbon and attach to the card front directly under the focal image.  Adhere the ¾” x 4” piece of Designer Series Paper to the 4” x 5 ¼” piece of Whisper White cardstock.  Stamp any of the small images or sentiments on this piece wherever desired and adhere to the inside of the card.