Tuesday, November 17, 2020

Christmas Gleaming Variety Bundle

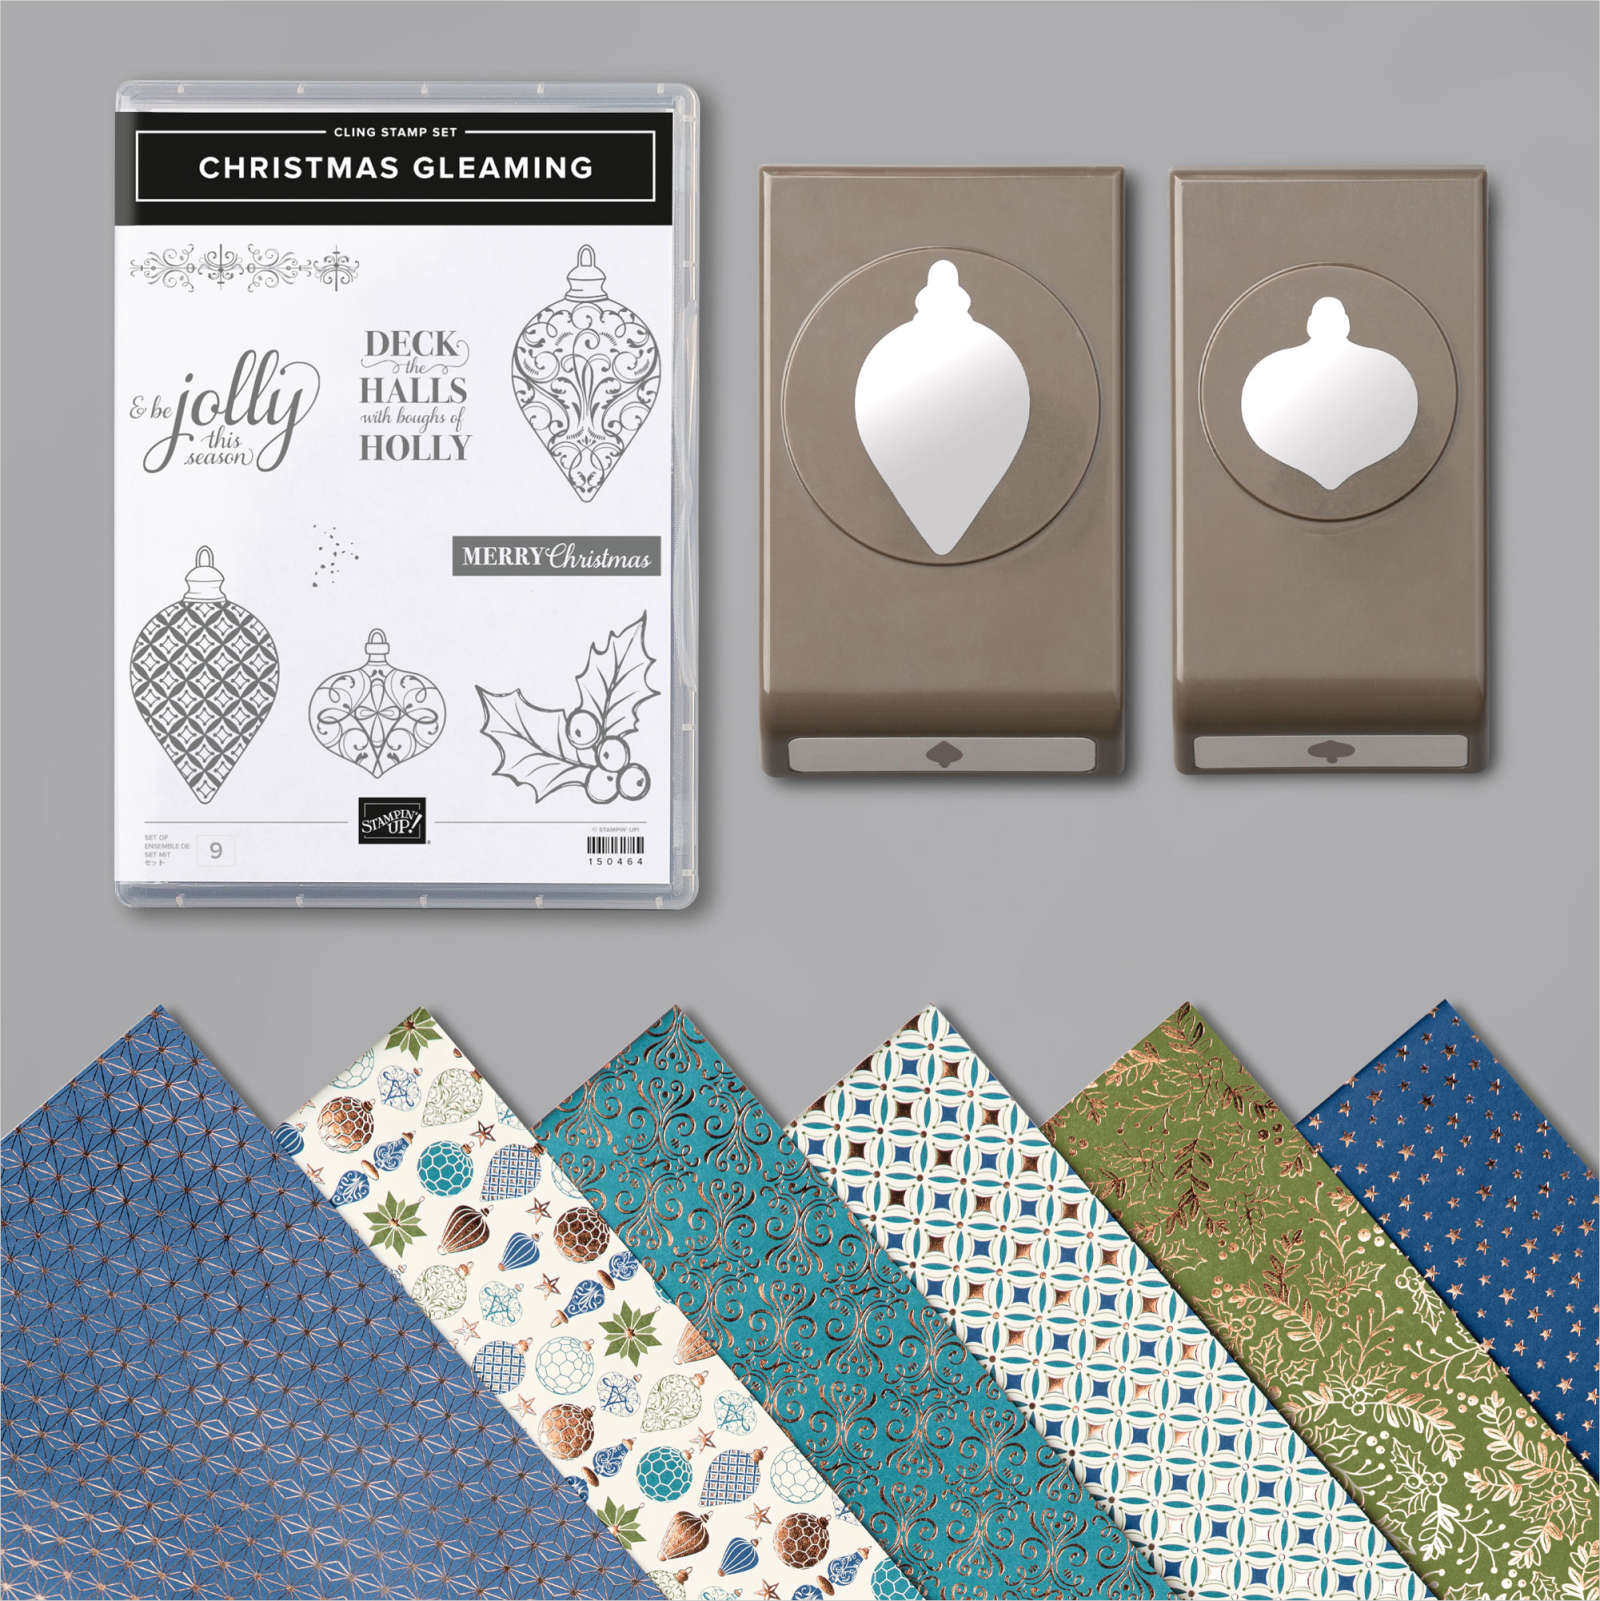
 Things are back to normal after all the excitement of participating in OnStage Live last weekend.  I am continuing projects which can be used for Christmas cards.  This week I am using the Christmas Gleaming Variety Bundle found on page 19 of the August-December 2020 Mini Catalog.  This bundle contains a stamp set, a punch pack and a pack of designer series paper!  It's a wonderful bundle!!! Here are the projects I demonstrated on my Facebook Live this past Sunday (11/15/20)

Deck the Halls Card


 Supplies:
Stamps: Christmas Gleaming
Inks: Memento Tuxedo Black, Night of Navy
Stampin’ Blends: Light and Dark Mossy Meadow, Light and Dark Cherry Cobbler
Cardstock:  Night of Navy – one piece cut to 8 ½” x 5 ½” and scored at 4 ¼”
Very Vanilla – five pieces; two pieces cut to 4” x 5 ¼”, one scrap large enough to accommodate the holly image in the stamp set, one scrap large enough to accommodate the smaller ornament image and one scrap large enough to accommodate a 2” circle punch
Copper Foil Sheets – One scrap large enough to accommodate a 2 ¼” circle punch
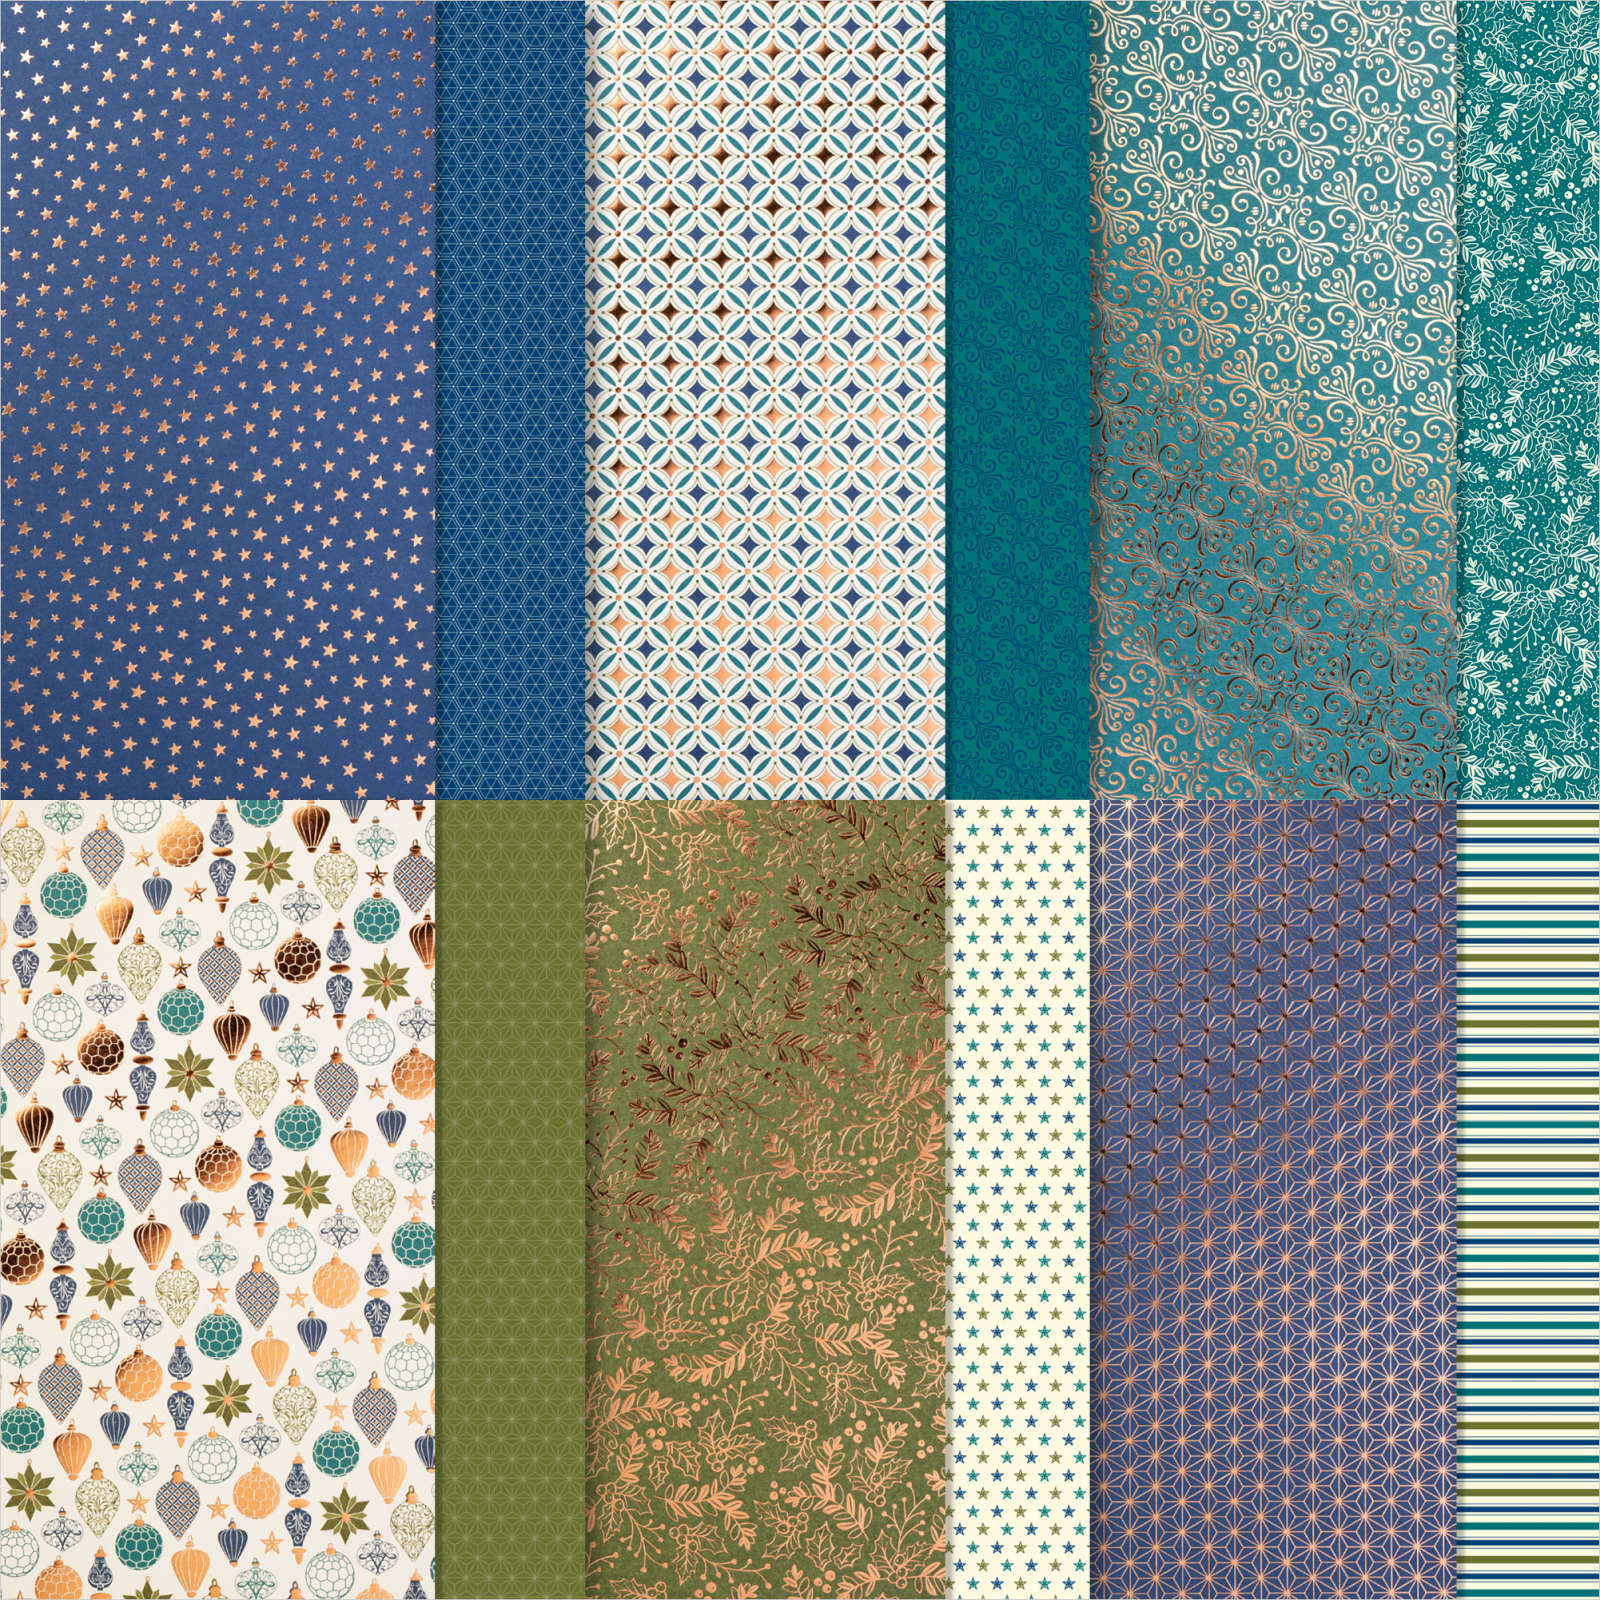
Designer Series Paper (DSP):  Brightly Gleaming (see photo for patterns used) – Pattern One - two pieces; one piece cut to 3” x 4”, one piece cut to ½” x 5 ¼”, Pattern Two – one piece cut to 2 ½” x 5 ¼”
Accessories:  Adhesive of choice, Stampin’ Dimensionals, Cinnamon Cider Stampin’ Write Marker, 2” Circle punch, 2 ¼” Circle punch, Gleaming Ornaments punch pack, Curvy Dies
 
Directions:

 Use the Curvy die dotted border die to cut the 3” x 4” Pattern One piece of DSP in half.  Adhere the 2 ½” x 5 ¼” Pattern Two piece of DSP to the center of one of the Very Vanilla 4” x 5 ¼” pieces of cardstock.  Adhere the two cut Pattern One pieces to this piece, you should have about a 1” gap between the pieces which allows the Pattern Two piece to show through. Use Memento ink to stamp the holly image of the stamp set onto one of the scraps of Very Vanilla.  Use the Light and Dark Mellow Moss and Light and Dark Cherry Cobbler Stampin’ Blends to color the image.  “Fussy cut” the image.  Use Night of Navy ink to stamp the “Deck the Halls” sentiment onto the scrap which is large enough to accommodate the 2” punch.  Punch the sentiment out with the 2” punch aligning the sentiment slightly to the right (so the Holly will fit onto the same circle).  Punch a circle from the Copper Foil Sheet scrap with the 2 ¼” punch.  Use Stampin’ Dimensionals to adhere the 2” circle piece to the 2 ¼” circle piece.  Adhere the cut out holly image to the left side of the 2” circle piece (see photo for placement) and then adhere the whole piece to the right front of the panel with the patterned DSP.  Adhere this whole piece to the card front.  Use Night of Navy ink to stamp the “& be Jolly” sentiment in the top left corner of the remaining 4” x 5 ¼” piece of Very Vanilla cardstock.  Adhere the ½” x 5 ¼” piece of Pattern One DSP to the bottom of the Very Vanilla piece.  Use Night of Navy ink to stamp the small ornament image onto the remaining scrap of Very Vanilla.  Use the coordinating punch from the Gleaming Ornaments punch pack to punch out the ornament. Color the ornament “hanger” with the Cinnamon Cider Stampin’ Write marker and then adhere it to the bottom right of the Very Vanilla piece, centering it on the right hand side of the DSP piece.  Adhere this piece to the inside of the card.  Enjoy!


Ornament Card


Stamps: Christmas Gleaming
Inks:  Night of Navy
Cardstock:  Night of Navy – One piece cut to 4 ¼ x 5 ½ and scored at 4 ¼”
Very Vanilla – four pieces; one piece cut to 1 ½” x 6”, one piece cut to 3” x 6”, one piece 1” x 2 ½” and one piece cut to 4” x 5 ¼”
Copper Foil Sheets – two pieces; one piece cut to 1” x 6” and one piece cut to ¾” x 6”
Designer Series Paper:  Brightly Gleaming (see photo for patterns used) – four pieces: Pattern One - one piece of cut to 4" x”5 ¼” (be mindful that the stripes of this DSP are running horizontally) and one piece cut to ¾” x 4”, Pattern Two – one piece cut to 4” x 5 ¼”, Pattern Three – one piece cut to 1 ½” x 4”
Accessories:  Adhesive of choice, Gleaming Ornaments punch pack.
 
Directions:
 

Adhere the ¾” x 4” piece of Pattern One DSP to the 4” x 5 ¼” piece of Very Vanilla cardstock and then adhere this piece to the inside of the card.  Cut the 4” x 5 ¼” piece of Pattern One DSP in half (you will now have two pieces, each 2” x 5 ¼”).  Flip one of the DSP pieces over so the striped image is showing.  Adhere both pieces to the card front with the striped piece being on the right hand side (see photo).  Adhere the 1” x 6” piece of the Copper Foil sheet to the top of the 3” x 6” piece of Very Vanilla cardstock. 
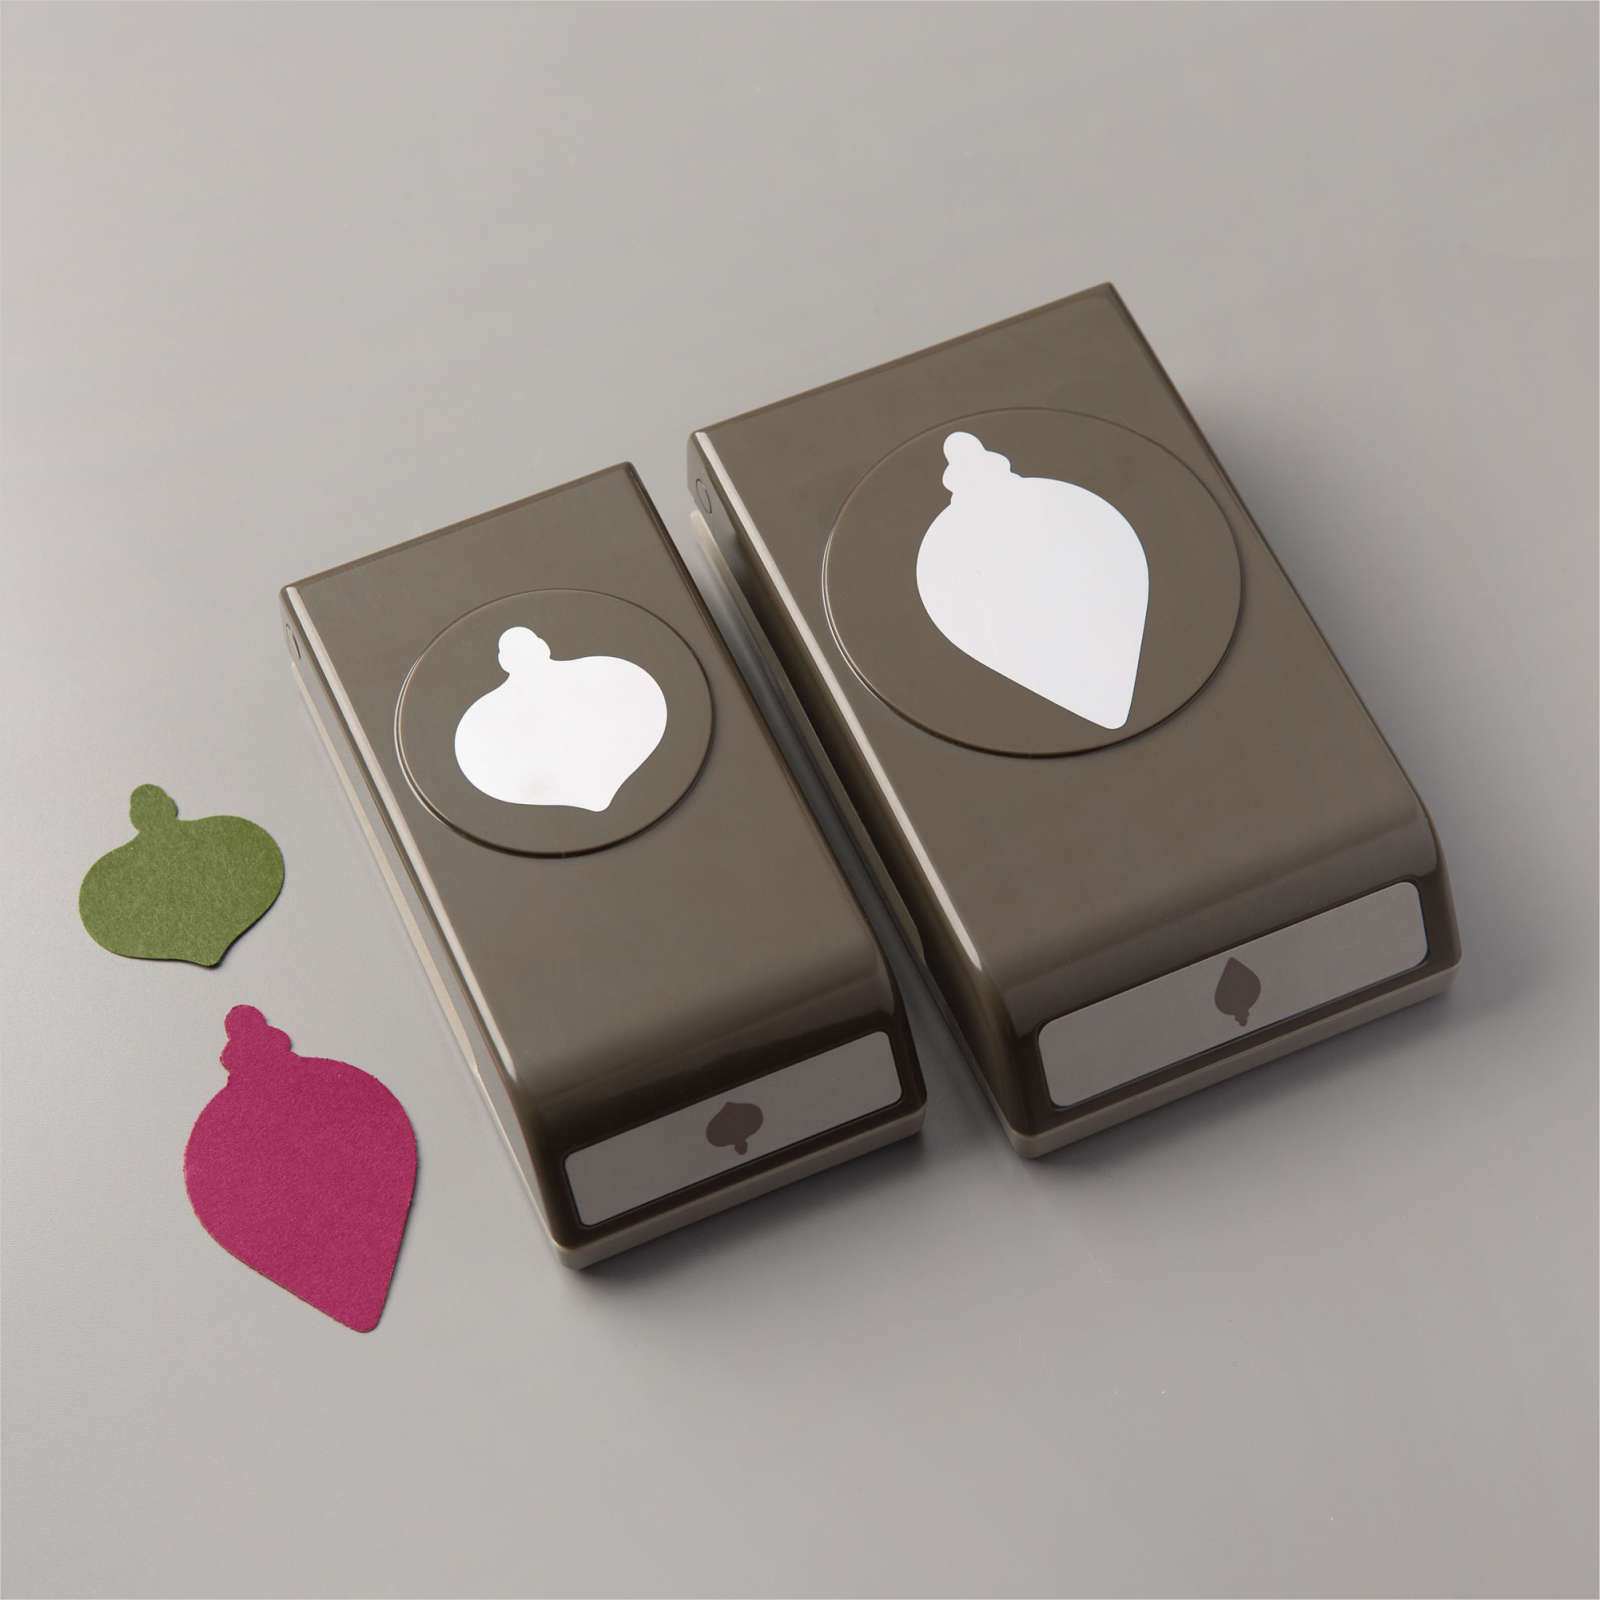
Use the large ornament punch from the Gleaming Ornaments punch pack to punch three ornaments (the copper will be at the top of the punched pieces) and then also punch three of these ornaments from the Pattern Two DSP.  Adhere the ¾” x 6” piece of the Copper Foil sheet to the top of the 1 ½” x 6” piece of Very Vanilla.  Use the small ornament punch from the Gleaming Ornaments punch pack to punch three ornaments (the copper will be at the top of the punched pieces) and then also punch three of these ornaments from the Pattern Three DSP.  Cut the ornament tops from the six punched DSP pieces, rounding as you cut to mimic the curve of the top of an ornament).  Adhere these to the corresponding punched pieces of the Very Vanilla with the copper at the top.  Adhere the completed ornaments to the card front using the photo for placement.  Use Night of Navy ink to stamp the “Merry Christmas” sentiment onto the remaining 1” x 2 ½” piece of Very Vanilla.  “Fussy cut” the image and then adhere it to the card front.  Enjoy!

 These are just two of the many ideas for this set.  It is so versatile! – you can even use the punches to create 3D ornaments!   You can see a video of the creation of these cards on the Facebook Live recording from November 15th on my Facebook Page HERE

If you would like to purchase these products just click "Add All to Cart" and you'll be taken directly to my Online store.  Be sure to use the November Host Code 9GCRE3GH if your order is under $150 (if it's over $150 be sure to take advantage of the Host Benefits offered by Stampin' Up!

Monday, November 9, 2020

Christmas Means More from Facebook Live 11-8-2020

I had a great weekend attending Stampin' Up!'s Onstage Live.  We normally gather in Salt Lake City for this event but due to the pandemic, we had the event virtually.  Stampin' Up! did an awesome job converting this event to a virtual event.  My roomies, Sue and Michelle and my downline Karen were able to chat during the presentations and met each day for a Zoom lunch.  We saw some awesome new products and got great ideas for presenting them to you!  I can't wait to show you some of the projects but will save them for when the products are available to you (well maybe I'll do a sneak peak closer to Christmas!)  


Christmas Means More Card


Supplies:
 
Stamps: Christmas Means More
Inks: Shaded Spruce
Stampin’ Blends: Light Just Jade, Dark Cherry Cobbler
Cardstock:  Shaded Spruce – one piece cut to 8 ½” x 5 ½” and scored at 4 ¼”
Whisper White – Two pieces; one piece cut to 2 ¾” x 3 ¾” and one piece cut to 4” x 5 ¼”
Cherry Cobbler – one piece cut to 5” x 3 ¾”
Designer Series Paper (DSP):  ‘Tis the Season – two pieces; one piece cut to 4 3/8” x 3 ¾” and one piece cut ¾” x 4”
Accessories:  Adhesive of choice, Stampin’ Dimensionals, Wonder of the Season Ribbon Combo Pack, Rhinestones, Stampin’ Trimmer, Mini Glue Dots
 
Directions:

This card uses a fun way of cutting DSP for a background that we learned from Sara Douglas, Stampin' Up!'s CEO.  Adhere the ¾” x 4” piece of DSP to the 4” x 5 ¼” piece of Whisper White cardstock.  Use Shaded Spruce ink to stamp the holly and berry image in the upper left corner of this piece.  Use the Dark Cherry Cobble and Light Just Jade Blends to color the image.  Attach this piece to the inside of the card base.  Place the 4 3/8” x 3 ¾” piece into the trimmer with the longer edge at the top of the trimmer.  Cut the DSP in half at an angle.  Cut each of the halves into three pieces using an angle cut each time.  BE SURE TO KEEP THE PIECES IN ORDER. Place the cut pieces in order on your work surface with the 3 ¾” length now along the top.  Adhere the pieces to the 5: x 3 ¾: piece of Cherry Cobbler cardstock starting with the top piece, then the bottom piece and then space the other pieces evenly between those two.  Adhere the finished piece to the front of the card.  Use Shaded Spruce ink to stamp the “Christmas Means More” sentiment onto the 2 ¾” x 3 ¾” piece of Whisper White cardstock, being sure to stamp the image at the top of the piece so as to leave room for the ribbon.  Use the Light Just Jade Blends to color the holly images in the sentiment.  Cut a 5” piece of the Shaded Spruce ribbon from the Wonder of the Season Ribbon Combo Pack and secure it around the bottom of the stamped piece.  Cut a 5” piece of the gold cording from the Wonder of the Season Ribbon Combo Pack and tie it around the center of the Shaded Spruce ribbon, gathering the ribbon as you tie a knot with the cord.  Cut the ends of the cord as close to the knot as possible.  Tie a bow with the Shaded Spruce ribbon and secure it over the gathered ribbon with mini glue dots.  Use Stampin’ Dimensionals to adhere this piece to the front of the card.  Use the Dark Cherry Cobble Blend to color six of the smallest rhinestones.  Adhere these to the card front as the berries in the holly images.  Enjoy!


Angel Gets Its Wings Card


Stamps: Christmas Means More

Inks:  Basic Gray
Stampin’ Blends:  Light Just Jade and Light Cherry Cobbler
Cardstock:  Smoky Slate – two pieces; on piece cut to 4 ¼ x 5 ½ and one piece cut to 2 ¾” x 8 ½” and scored at 4 ¼” and a scrap at least 1” x 1”
Cherry Cobbler – three pieces – one piece cut to 4 1/8” x 2 5/8” and two pieces cut to 1 ¼” x 4 1/8”
Whisper White – two pieces cut to 2 ½” x 4”
Designer Series Paper:  ‘Tis the Season – four pieces; two pieces cut to 1 1/8 x 4” and two pieces cut to ¾” x 2 ½”
Accessories:  Adhesive of choice, Whisper White Crinkled Seam Binding Ribbon, Mini Glue Dots, Stampin’ Dimensionals, Wink of Stella
 
Directions:

Adhere the two pieces of 1 ¼” x 4 1/8” Cherry Cobbler cardstock to the right and left edges of the 4 ¼” x 5 ½” piece of Smoky Slate cardstock leaving about a 1/16border around the edges.  Adhere the two 1 1/8” x 4” pieces of DSP to the Cherry Cobbler panels again leaving a 1/16” border.  Adhere the scored 2 ¾” x 8 ½” piece of Smoky Slate cardstock to the card base with the fold along the top edge.  Adhere one of the ¾” x 2 ½” pieces of DSP to one of the 2 ½” x 4” pieces of Whisper White cardstock and adhere to the inside of the folded Smoky Slate piece.  Adhere the 4 1/8” x 2 5/8” piece of Cherry Cobbler to the front of the folded Smoky Slate Piece leaving a 1/16’ inch border.  Use Basic Gray ink to stamp the sentiment onto the remaining piece of 2 ½” x 4” piece of Whisper White cardstock, positioning it toward the top of the piece. Color the bells in the image using the Just Jade and Light Cherry Cobbler Blends.  Adhere the remaining ¾” x 2 ½” piece of DSP to the stamped piece about ¼” to ½” from the bottom of the piece.  Use Basic Gray ink to stamp the small bell image onto the small scrap of Smoky Slate cardstock.  Use scissors to “fussy cut” the image. Use a Stampin’ Dimensional to adhere the bell to the right side of the strip of DSP.  Tie a small bow with the ribbon and adhere it to the top of the small bell with a mini glue dot.  Use Wink of Stella to accent all the bell images. I wish you could really see the sparkle the Wink of Stella adds!  Enjoy!


II adore this set and it really makes quick and easy cards.  You can see a video of the creation of these cards on the Facebook Live recording from November 8th on my Facebook Page HERE


See you next Sunday (November 15th) at 2pm on my Facebook Live!

Monday, November 2, 2020

Curvy Celebrations

For the past few years, right before the release of a new mini-catalog or the major catalog, Stampin’ Up! gives customers a chance purchase Early-Release products.  This year, they’ve added something new!  In addition to the Early-Release products you have the chance to buy exclusive products that match the bundle!  These additional products are available for a limited time (November 3rd – January 4th).   The name of the Early-Release Bundle is the Quite Curvy Bundle and the exclusive products are the Curvy Christmas Stamp Set and Classic Christmas 6” x 6” Designer Series Paper.  You can see everything that’s included in my Online Store tomorrow, November 3rd.  Just click on my Shop Now button.  Here are the cards I demonstrated during my Facebook Live on November 1st.


Happiest of Birthdays Card


Supplies:

 Stamps: Quite Curvy
Inks: Early Espresso and Tuxedo Black Memento Ink
Stampin’ Blends: Light Just Jade, Light Cherry Cobbler and Light and Dark Seaside Spray
Cardstock:  Sahara Sand – one piece cut to 8 ½” x 5 ½” and scored at 4 ¼”
Whisper White – two pieces cut to 4” x 5 ¼” and scraps large enough to accommodate the die cuts
Designer Series Paper (DSP):  Classic Christmas – two pieces; one 4” x 4” and one ½” x 4”
Accessories:  Adhesive of choice, Stampin’ Dimensionals, Curvy Dies
 
Directions:
 

Use the curved die with the “dot” cutouts from the Curvy Dies to cut the 4” x 4” piece of DSP (about 1/3 of the way from the top of the DSP).  Use Memento Ink to stamp the ivy image, the floral garden image and two birds onto a scrap of Whisper White cardstock (you may have to use several scraps) then use the matching Curvy Dies to cut them out.  Color the ivy image with the Light Just Jade Blend, the garland with Light Just Jade and Light Cherry Cobble Blends and the birds with Light and Dark Seaside Spray Blends.  Adhere the piece of DSP with the plain edge to the bottom of one of the 4’ x 5 ¼” pieces of Whisper White cardstock.  Use Stampin’ Dimensionals to adhere the ivy image along the curve of this piece and trim the image even with the sides of the card.  Adhere the remaining piece of DSP to the top portion of the Whisper White piece (you should have about a 1” gap of Whisper White showing between the two DSP pieces).  Use Stampin Dimensionals to adhere the garland image and the two birds to the top portion of the card (see photo for placement).  Attach the sentiment stamp to an acrylic block making sure it follows the curves of the cut DSP (photopolymer stamps are flexible so you can bend them as needed).  Use Early Espresso ink to stamp the sentiment, centering it between the two DSP pieces.  Adhere this whole piece to the front of the card base.  Adhere the ½” x 4” piece of DSP to the remaining 4” x 5 ¼” piece of Whisper White and then adhere to the inside of the card base.


Merry and Bright Card


Supplies:

Stamps: Curvy Christmas
Inks:  Shaded Spruce, Cherry Cobbler
Cardstock:  Cherry Cobbler – one piece 8 ½” x 5 ½” scored at 4 ¼”
Whisper White – three pieces; two cut to 4: x 5 ¼” and one cut to 4 1/8” x 5 3/8”
Designer Series Paper:  Classic Christmas – three pieces; one cut to 3: x 6”, one cut to 2” x 6” and one cut to ½’ x 6”
Accessories:  Adhesive of choice, Curvy Dies
 
Directions:
 

Use the curved die with the “dot” cutouts from the Curvy Dies to cut the 2” x 6” and the 3” x 6” pieces of DSP in half.  Adhere two of the pieces to the bottom of one of the 4” x 5 ¼” pieces of Whisper White aligning the left edges (see photo for placement).  The DSP will be longer than the cardstock, just trim that off.  Use Shaded Spruce ink to stamp the tree image directly above the DSP and then use Cherry Cobbler ink to stamp the sentiment above the trees (again being sure the curve of the stamp matches the curve of the DSP). Adhere the remaining two pieces of DSP to the top of the card and trim off any DSP.  Again, trim the DSP to match the cardstock as needed.  Mount this piece to the 4 1/8” x 5 3/8” piece of Whisper White cardstock and then adhere to the Cherry Cobbler card base.  Adhere the ½” x 6” piece of DSP to the long side of the remaining 4” x 5 ¼” piece of cardstock and then adhere to the inside of the card base.


I hope you love working with these brand new products as I have.  You can see a video of the creation of these cards on the Facebook Live recording from November 1st on my Facebook Page HERE


See you next Sunday (November 8th) at 2pm on my Facebook Live!