Tuesday, July 27, 2021

Inspired Thoughts Bundle featured on Facebook Live July 25, 2021


It’s the last week of Christmas in July! Next week I will start showing NEW products from the July - December 2021 Mini Catalog and Sale’A-Bration Catalog.  Yes, the title of the Catalog is correct – Due to Covid 19 there were delays in receiving many of the materials needed for our products, so rather than have tons of backorders, it was decided to hold off the launch of the Mini Catalog until August.  Stampin’ Up! is always looking out for us!  The following cards were featured on my Facebook Live on July 25, 2021 and feature the Inspired Thoughts Bundle  featured on page 52 of the 2021-2022 Annual Catalog,


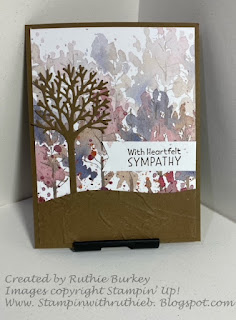
Sympathy Card


Supplies:
 
Stamps:  Inspired Thoughts
Ink:  Early Espresso
Cardstock:  Soft Suede – three pieces; one piece cut to 8 ½” x 5 ½” and scored at 4 ¼” for the card base, one piece 2 ½” x 4” and one piece cut to 2” x 4”
Basic White –one piece cut to 4” x 5 ¼” Crumb Cake – One piece cut to 2” x 4”
Designer Series Paper (DSP):  Beauty of the Earth – three pieces; one piece cut to 4” x 5 ¼” , one piece cut to ½” x 4” and one piece cut to ¾” x 3 ½” (see photo for pattern used – the smaller piece is cut from the middle portion of the pattern used.)
Accessories:  Adhesive of choice, Stampin’ Cut & Emboss Machine, Inspiring Canopy Dies, Painted Texture 3D Embossing Folder, Adhesive Sheets.

Directions: 

1.    Use Early Expresso Ink to stamp the “Sheltering you with Love…..” sentiment onto the top center of the 4” x 5 ¼” piece of Basic White. 

2.    Adhere the ½” x 4” piece of DSP to the bottom of the stamped 4” x 5 ¼” piece of Basic White and then adhere the whole piece to the inside of the card.

3.    Adhere the 4” x 5 ¼” piece of DSP to the card front.

4.    Adhere a 2 ½” x 4” piece of Adhesive Sheets to the back of the 2 ½” x 4” piece of Soft Suede Cardstock.

5.    Use the Stampin’ Cut & Emboss Machine to cut a portion of the trees from the 2 ½” x 4” piece of Soft Suede Cardstock,

6.    Use the Stampin’ Cut & Emboss machine and the wavy die from the Inspiring Canopy Dies to cut a hill shape from the 2” x 4” piece of Soft Suede cardstock then place the cut piece into the Painted Texture 3D Embossing Folder and run though the Stampin’ Cut and Emboss Machine.  Adhere this piece to the bottom of the card front.

7.    Remove the backing of the Adhesive Sheets from the back of the die cut tree and place it on the left side of the card with the base of the tree meeting the “hill”.

8.    Use Early Espresso Ink to stamp the “Sympathy” sentiment onto right side of the ¾” x 3 ½” piece of DSP.  Cut a banner end on the left side using scissors or a punch.  Adhere to the right side of the card front (see photo for placement).

9.    Send to someone who is in need of comfort.


Peace, Joy, Love Card


Supplies:
 
Stamps:  Inspired Thoughts
Ink:  Night of Navy, Versamark
Cardstock:  Night of Navy – one piece cut to 8 ½” x 5 ½” and scored at 4 ¼” for the card base
Basic White - one piece cut to 4” x 5 ¼”
Shimmery White cardstock - one piece cut to 4” x 5 ¼”
Designer Series Paper (DSP):  Beauty of the Earth – two pieces; one piece cut to 4” x 5 ¼” and one piece cut to ¾” x 5 ¼: (see photo for pattern used – NOTE:  This is a one way pattern so be sure to cut in a Landscape orientation)
Accessories:  Adhesive of choice, Stampin’ Cut & Emboss Machine, Adhesive Sheets, White Embossing Powder, Heat Tool, Wink of Stella
  
Directions: 

1.    Adhere a 4” x 5 ¼” piece of Adhsesive Sheets to the back of the 4” x 5 ¼” piece of Shimmery White Cardstock.

2.    Use the Stampin’ Cut & Emboss Machine to cut the large tree dies from the Shimmery White Cardstock. 

3.    Remove the backing from the tree die cut and adhere to the 4” x 5 ¼” piece of DSP

4.    Use Versamark ink to stamp the “Peace, Joy, Love” sentiment between the trunks of the trees (see photo for placement).  Cover the stamped sentiment with White Embossing Powder (removing excess afterwards) and then heat with the Heat Tool.

5.    Prime the Wink of Stella by squeezing over a piece of paper towel then “flick” the Wink of Stella all over the piece of DSP containing the trees, then adhere the piece to the front of the card base.

6.    Use Night of Navy Ink to stamp the “Wishing you all the Beautiful Gifts….” Sentiment to the top center of the 4” x 5 ¼” piece of Basic White (remember to place the cardstock into a landscape orientation before stamping) then adhere the ¾” x 5 ¼” piece of DSP to the bottom of the stamped Basic White Cardstock.

7.    Adhere this whole piece to the inside of the card.

8.    Voila!  Another Christmas card done!!! 


If you are having problems visualizing these directions, remember you can see them created step-by-step on my Facebook Live from July 25th   HERE.  Enjoy these projects and please share them with a special friend!


Remember, if you would like to purchase any of the supplies to make these cards, just click the “Shop Now” button above to be taken to my Online Store.  Be sure to use the Host Code (also listed above) if your order is under $150 (if your order is over $150 be sure to take advantage of the Host Rewards offered by Stampin’ Up!)


See you on Sunday, August 1st at 2pm on my next Facebook Live!

Saturday, July 24, 2021

Bloom Where You're Planted Suite featured on Facebook Live Sunday, July 18, 2021


It’s Christmas in July! Each week in July I’m featuring a stamp set/suite in the Annual Catalog.  I’m creating one card using the set as intended and then I’m using parts of the set or the matching dies to create a Christmas Card. These cards were featured on my Facebook Live on July 18 2021 and feature the Bloom Where You’re Planted Suite featured on pages 80 and 81 of the 2021-2022 Annual Catalog


Biggest Thanks Card


Supplies:
 
Stamps:  Plentiful Plants
Ink:  Evening Evergreen
Cardstock:  Thick Basic White – one piece cut to 8 ½” x 5 ½” and scored at 4 ¼” for the card base
Evening Evergreen – two pieces; one piece cut to 4” x 5 ¼” and one scrap 1” x 1 ½”
Crumb Cake – One piece cut to 2” x 4”
Just Jade – one scrap 1 ½” x 2”
Cinnamon Cider – one scrap 1” x ½”
Designer Series Paper (DSP):  Bloom Where You’re Planted –
Pattern One: two pieces; one piece cut to 3 ¾” x 5” and one piece cut to ¾” x 4” (see photo for pattern used)
Pattern Two: (the pattern with the empty pots on it) one piece that contains the image of the terracotta pot for the hanging basket
Accessories:  Adhesive of choice, Stampin’ Cut & Emboss Machine, Perfect Plants Dies, Linen Thread, Stampin’ Dimensionals. Tombow Multi-Purpose Glue. 

1.    Adhere the 3 ¾” x 4” piece of Pattern One DSP to the 4” x 5 ¼” piece of Evening Evergreen cardstock.  Use Evening Evergreen ink to Stamp the sentiment on the lower left corner of this piece.

2.     Use the Stampin’ Cut and Emboss Machine to cut the macramé basket from Crumb Cake cardstock, two of the “grass” looking dies from the Just Jade cardstock scrap and one of the “grass” looking dies from the Evening Evergreen cardstock scrap, one of the smallest half-round pots from the Cinnamon Cider cardstock scrap, and a Terra Cotta pot from the DSP with the empty pots.

3.    Adhere the Terra to the macramé basket then adhere the two “grass” looking Just Jade dies and the one “grass” looking Evening Evergreen die cuts to the back of the pot. (see photo for placement).  Use Stampin’ Dimensionals to adhere the hanging pot to the upper left hand side of the DSP/Evening Evergreen piece.  Cut a 6” piece of Linen Thread and thread through the top of the hanging pot, bringing the ends to the back of the DSP/Evening Evergreen piece and then adhere this to the card front.

4.    For the inside of the card (sorry, sent the cards off before taking a photo of the inside but it is shown in the video), adhere the ¾” x 4” piece of DSP to the lower portion of the inside of the card.  Use Evening Evergreen ink to stamp the aloe Vera (or it could be Mother-In-Law’s Tongue, I’m not sure) directly above the right side of the DSP.  Place the small half round pot directly below the plant and then used Evening Evergreen Ink to stamp the “Thank You” sentiment on the top center of the inside of the card.

5.    Send to someone who deserves your “Biggest Thanks”!


 Christmas Ornament Card


Supplies:
 
Stamps:  None – this is an all die cut card!
Cardstock:  Evening Evergreen – one piece cut to 8 ½” x 5 ½” and scored at 4 ¼” for the card bas
Misty Moonlight – one piece cut to 3 5/8” x 3 5/8”
Window Sheet – one piece cut to 3 ½” x 3 ½”
Basic White - one piece cut to 4” x 5 ¼”
Copper Foil Sheets - one piece cut to 3” x 4”
Designer Series Paper (DSP):  Tidings of Christmas–
Pattern One – one piece cut to 3 ½” x 3 ½”
Pattern Two – seven pieces – one piece cut to 4” x 5 ¼”, four pieces cut to ½” x 3 ½” and one piece cut to ¾” x 4”
Pattern Three – one piece cut to ½” x 3 ½” (see photo for patterns used)
Accessories:  Adhesive of choice, Stampin’ Cut & Emboss Machine, Layering Circles dies, Word Wishes Dies, Adhesive Sheets, Evening Evergreen 3/8” Open Weave Ribbon, Mini Glue Dots, grid paper
Technique:  Floating Dies

 Directions: 

1.    Adhere the 4” x 5 ¼” piece of Pattern Two DSP to the front of the card base. 

2.    Adhere the 3 ½” x 3 ½” piece of Pattern One DSP to the 3 5/8” x 3 5/8” piece of Misty Moonlight cardstock then adhere this piece to the top portion of the card front (see photo for placement)

3.    Place the 3 1/3” x 3 ½” piece of Window Sheet onto your grid paper.  Adhere the Pattern Three piece of DSP to the very center (each piece of DSP with cover two lines of squares on the grid paper)  Skip one row of the squares below this piece and then adhere one piece of the Pattern Two DSP.  Skip another row and adhere one more piece of the Pattern Two DSP this time flipping the DSP to the opposite side.  Repeat this pattern above the Pattern Three DSP.   Use the Stampin’ Cut & Emboss Machine and the 3” smooth edged circle from the Layering Circles dies to cut a circle from the Window Sheet/DSP piece. 

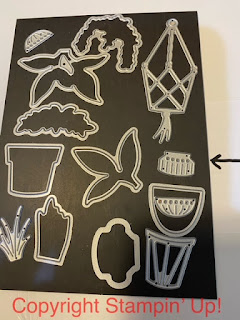
4.    Apply Adhesive Sheet to the back of the 3” x 4” piece of Copper Foil Sheet. Use the Stampin’ Cut & Emboss Machine and the Word Wishes dies to cut “Merry” and “Christmas”.  Use the leftovers of the Copper Foil Sheet and the Perfect Plants dies to cut the die that looks like an ornament top (see photo below for die used)


5.    Remove the backing from the Words and the Ornament toper and place on the die cut circle (see photo for placement).  On the back of the die cut circle, place Stampin’ Dimensionals only on the areas where the DSP is.  Remove the backing from the Dimensionals and adhere the “Ornament” to the card front.

6.    Tie a bow with the Evening Evergreen 3/8” Open Weave Ribbon and adhere to the top of the ornament using a Mini Glue Dot.

7.    Adhere the remaining ¾” x 4” piece of Pattern Two DSP to the bottom of the 4” x 5 ¼” piece of Basic White cardstock and then adhere to the inside of the card.

8.    Voila!  Another Christmas card done!!! 

If you are having problems visualizing these directions, remember you can see them created step-by-step on my Facebook Live from July 18th   HERE.  Enjoy these projects and please share them with a special friend! 

Remember, if you would like to purchase any of the supplies to make these cards, just click the “Shop Now” button above to be taken to my Online Store.  Be sure to use the Host Code (also listed above) if your order is under $150 (if your order is over $150 be sure to take advantage of the Host Rewards offered by Stampin’ Up!)


See you on Sunday, July 25th at 2pm on my next Facebook Live!

Tuesday, July 13, 2021

Banner Year Stamp Set featured on Facebook Live Sunday, July 11, 2021`


It’s Christmas in July! These cards were featured on my Facebook Live on July 11, 2021 and feature the Banner Year stamp set featured on page 95 of the 2021-2022 Annual Catalog


Christmas Wishes Card


Supplies:
 
Stamps:  Banner Year
Ink:  Evening Evergreen, Real Red
Cardstock:  Evening Evergreen – one piece cut to 8 ½” x 5 ½” and scored at 4 ¼” Basic White: - one piece cut to 4” x 5 ¼”
Designer Series Paper (DSP):  Heartwarming Hugs (available after August 3rd) – two pieces; one piece cut to 4” x 5 ¼” and one piece cut to ¾” x 4” (see photo for pattern used)
Accessories:  Adhesive of choice, Stampin’  Cut & Emboss Machine, Stitched Rectangles dies, Evening Evergreen 3/8” Open Weave Ribbon


Directions:


1.     Cut about 11” of the Evening Evergreen 3/8” Open Weave ribbon.  Tie a “cheater knot” (see video if you haven’t ever done this) and attach lower third of  the 4” x 5 ¼” piece of DSP,

2.    Attach the DSP to the card front.

3.    Use the Stampin’ Cut & Emboss Machine and the Stitched Rectangle dies to cut a window in the top portion of the card front. 

4.    Adhere the ¾” x 4” piece of DSP to the 4” x 5 ¼” piece of Basic White and then adhere this piece to the inside of the card.

5.    Close the card and use Evening Evergreen ink to stamp the sentiment through the window of the card front onto the inside of the card.

6.    With the card still closed, use Real Red ink to stamp three Santa Hats above the sentiment.

7.    Use this card to get a jump on your Christmas Cards!


Be Merry Card


Supplies:
 
Stamps:  Banner Year
Ink:  Evening Evergreen, Real Red
Cardstock:  Evening Evergreen – one piece cut to 8 ½” x 5 ½” and scored at 4 ¼” and 3 ¼”
Basic White: - Two pieces; one piece cut to 3” x 5 1/4" and one piece cut to ¾” x 3”
Designer Series Paper (DSP):  Heartwarming Hugs (available after August 3rd) – Pattern One – two pieces; one piece cut to 3” x 5 ¼” and one piece cut to ¾” x 3”.  Pattern Two – one piece cut to ¾” x 5 ¼” (see photo for patterns used)
Accessories:  Adhesive of choice, Stampin’  Cut & Emboss Machine, Layering Circles dies, Banners Pick A Punch. Pearl Basic Jewels
Fun Fold:  Book Fold Card
 
 
Directions:


1.    Fold the 5 ½” x 8 ½” card base along the 4 ¼” score line. Adhere the 3” x 5 ¼” piece of Pattern One DSP to the large right section of the card front..

2.    Use the Stampin’ Cut & Emboss Machine and the smallest of the scalloped Layering Circles dies to cut an opening in the lower right portion of the card front.

3.    On the inside of the card, place adhesive in the space between the 3 ¼” score line and the 4 ¼” score line.  Close the card.  This will create a “spine” for your book fold. 

4.    Adhere the ¾” x 5 ¼” piece of Pattern Two DSP to the left side of the card front along the “spine”. 

5.    Adhere the 3” x 5 ¼” piece of Basic White cardstock to the inside of the card.

6.    Close the card and use Real Red ink to stamp the bird image through the circle cut into the card front.  Adhere one of the smallest Pearl Basic Jewels to the bird’s eye.

7.    Open the card and adhere the ¾” x 3” piece of Pattern Two DSP below the bird image being sure that the DSP doesn’t show through the opening in the card front.

8.    Create a banner end on the left side of the ¾” x 3” piece of Basic White cardstock.

9.    Use Evening Evergreen Ink to stamp the “be merry” sentiment and the holly leaves onto the banner piece.  Use Real Red ink to stamp the holly berries and then adhere this piece to the card front directly below the circle opening.

10. Voila!  Another Christmas Card done!!!


If you are having problems visualizing these directions, remember you can see them created step-by-step on my Facebook Live from July 11th   HERE.  Enjoy these projects and please share them with a special friend!


Remember, if you would like to purchase any of the supplies to make these cards, just click the “Shop Now” button above to be taken to my Online Store.  Be sure to use the Host Code (also listed above) if your order is under $150 (if your order is over $150 be sure to take advantage of the Host Rewards offered by Stampin’ Up!)


See you on Sunday, July 18th at 2pm on my next Facebook Live!

Monday, July 5, 2021

Biggest Wish featured on Facebook Live Sunday, June 27, 2021


These cards were featured on my Facebook Live on June 27, 2021 and feature the Biggest Wish stamp set featured on page 63 of the 2021-2022 Annual Catalog


Hello Card


Supplies:
 
Stamps:  Biggest Wish
Ink:  Real Red, Pumpkin Pie, Crushed Curry, Garden Green, Pacific Point, Memento Tuxedo Black
Cardstock:  Night of Navy – one piece cut to 8 ½” x 5 ½” and scored at 4 ¼”
Basic White: - two pieces cut to 4” x 5 ¼”
Accessories:  Adhesive of choice, Stamparatus, Small Grid Paper

Directions: 

1.    Since this stamp set is photopolymer, place the foam mat into the Stamparatus and then place a sheet of Small Grid paper on top of the foam.  Secure one of the 4” x 5 ¼” pieces of Basic White onto the grid paper about 1” from the left side of the grid paper and 1” down from the top of the grid paper (I usually use just a small amount of adhesive to secure it to the paper). Use the magnets placed along the left side of the cardstock (about ½” away” to keep the paper from lifting when you stamp.

2.    Place the “Hello” stamp face down onto the upper left corner of the cardstock and then close the “door” to the Stamparatus to pick up the stamp.   

3.     Ink the stamp with Real Red Ink and close the Stamparatus door to stamp the image onto the cardstock.  If needed, stamp again.

4.    Clean the stamp and re-ink with Pumpkin Pie ink.  Move the door of the Stamparatus down one “step”.  Close the door to stamp the image onto the cardstock.

5.    Repeat this process, cleaning and moving down another step with the three remaining colors (Crushed Curry, Garden Green and lastly Pacific Point)

6.    Remove the cardstock from the Stamparatus and adhere to the card front.

7.    Clean the “Hello” stamp and remove it from the Stamparatus.  Mount it onto an acrylic block and the stamp the sentiment in Crushed Curry on the remaining 4” x 5 ¼” piece of Basic White Cardstock.  You can stamp it in the top center or the bottom right of the piece, your choice.  Use Memento Ink to stamp the script “friend” directly over the “Hello” sentiment, then adhere this piece to the inside of the card.   

8.    Send to someone you haven’t seen lately!


Happy Birthday Ombre Gift Bag and Card


 Supplies:
 
Stamps:  Biggest Wish
Ink:  Fresh Freesia, Memento Tuxedo Black
Cardstock:  Fresh Freesia – one piece cut to 8 ½” x 5 ½” and scored at 4 ¼”
Basic White: - two pieces cut to 4” x 5 ¼”
Accessories:  Adhesive of choice, Stamparatus, Small Grid Paper, Ombre Gift Bags, Mini Glue Dots, Fresh Freesia 3/8” Open Weave Ribbon, White birthday candle.
 
Directions:

For the Gift Bag:

Use the directions for the Hello Card above using the “Birthday” stamp and Fresh Freesia ink on one of the Fresh Freesia Ombre Gift Bags. Ink the Script “Happy” stamp and stamp it in the middle of one of the “Birthday” images.  Tie the bag shut with the Fresh Freesia 3/8” open weave ribbon (about 14”)

 For the Card: 

1.     Starting in the upper left corner of the one of the 4” x 5 /14” pieces of Basic White cardstock (or lower right if you are left-handed as I am) stamp the bold “Happy” sentiment diagonally across the card using Fresh Freesia ink.  Continue this until the entire piece is covered. 

2.    Use Memento Ink to stamp the script “birthday” greeting diagonally onto the right side of the middle row of the “Happy” greetings. 

3.    Use about 7-9” of the Fresh Freesia 3/8” Open Weave Ribbon to tie a bow around the birthday candle.  Use a Mini Glue Dot to adhere the candle to the card front to the left of the “birthday” sentiment. (you will need to put the glue dot on the ribbon as it will not stick to the candle).

4.    Use Fresh Freesia ink to stamp the “Happy” sentiment to the bottom center of the remaining 4” x 5 ¼” piece of Basic White Cardstock and then use the Memento ink to stamp the script “birthday” sentiment directly over that.  Adhere this piece to the center of the card.

5.    You might want to keep a few of these on hand to slip a gift card into for a quick gift!


If you are having problems visualizing these directions, remember you can see them created step-by-step on my Facebook Live from June 27th   HERE.  Enjoy these projects and please share them with a special friend!

 Remember, if you would like to purchase any of the supplies to make these cards, just click the “Shop Now” button above to be taken to my Online Store.  Be sure to use the Host Code (also listed above) if your order is under $150 (if your order is over $150 be sure to take advantage of the Host Rewards offered by Stampin’ Up!)


See you on Sunday, July 11th at 2pm on my next Facebook Live!

Color and Contour Bundle featured on Facebook Live June 20, 2021


These cards were featured on my Facebook Live on June 20, 2021 and feature the Color and Contour Bundle found on page 98 of the 2021-2022 Annual Catalog  

Thank you for Everything


Supplies:
 
Stamps:  Color & Contour
Ink:  Fresh Freesia. Memento Tuxedo Black ink
Stampin’ Blends:  Light So Saffron
Cardstock:  Fresh Freesia – one piece cut to 11” x 4 ¼” and scored at 5 ½”
Basic White: - four pieces; one piece cut to 4 ¼” x 5 ½”, one piece cut to 4” x 5 ¼”, one piece cut to 2 ½” x 3 ½” and one piece cut to 3” x 2 ¾”
Designer Series Paper (DSP):   In Color 6” x 6” 2021 – 2023 (see photo for pattern used) – one piece cut to ¾” x 5 ¼”
Accessories:  Adhesive of choice, Stampin’ Cut & Emboss Machine, Scalloped Contours dies, Fresh Freesia 3/8” Open Weave Ribbon, Blending Brushes, Stampin’ Dimensionals, Mini Glue Dots and low tack painter’s tape
 
Directions: 

1.    Use the Stampin’ Cut & Emboss machine to cut the largest scalloped edge die in the Scalloped Contours dies from the 4 ¼” x 5 ½” piece of Basic White cardstock.

2.    Secure the Scalloped piece to a piece of scrap paper by using the painter’s tape, placing the tape so it covers the scallops but leaves the center rectangle of the piece free.

3.    Use a Blending Brush to apply ink around the outside edge of the rectangle created by the painter’s tape.

4.    Use Fresh Freesia ink to randomly stamp the large outline single flower onto the rectangle created by the painter’s tape. (Stamp the inked stamp onto the scrap paper each time so as to provide a softer background, this is called “Stampng Off”.)

5.    Stamp randomly around the edge the Fresh Freesia ink and the splatter stamp around the edges – “stamping off” to create a lighter image.

6.    Carefully remove the painter’s tape and you will see that the scallops are left nice and white!  Adhere this piece to the card front (the fold of the card front will be on the left hand side)

7.    Use the Stampin, Cut & Emboss machine to cut the second smallest rectangle of the Scalloped Contours dies from the 3” x 2 ¾” piece of Basic White.

8.    Use Memento ink to stamp the “Thank You for Everything” sentiment onto the right side of the scalloped rectangle then adhere this piece at an angle to the card front.

9.    Use Memento ink to stamp the large single flower outline stamp onto the 2 ½” x 3 ½” piece of Basic White Cardstock and use Fresh Freesia ink to stamp the coordinating solid stamp to color the flower.  Color the middle of the flower with the Light So Saffron Blends marker. Use Stampin’ Cut & Emboss machine to cut the flower out using the coordinating die from the Scalloped Contours dies and then use Stampin’ Dimensionals to adhere the flower to the sentiment piece on the card front (see photo for placement.

10. Tie a bow using the Fresh Freesia 3/8” Open Weave Ribbon and use a Mini Glue Dot to adhere the bow to the card front.

11. Adhere the ¾” x 5 ¼” piece of DSP to the bottom of the 4” x 5 ¼” piece of Basic White cardstock and then adhere to the inside of the card.

12. Send to someone who deserves some special thanks!


You’re Absolutely Amazing


Supplies:
 
Stamps: Color & Contour
Ink:  Fresh Freesia, Memento Tuxedo Black
Stampin’ Blends:  Light Old Olive
Cardstock:  Fresh Freesia – One piece cut to 8 ½” x 5 ½” and scored at 4 ¼”
Basic White – five pieces; two pieces cut to 4” x 5 ¼”, two pieces cut to 1 ½” x 5 ¼” and one piece cut to 1 ½” x 5 ½”
Designer Series Paper (DSP): In Color 6” x 6” 2021 – 2023 (use at least two patterns of the Fresh Freesia color) – 12 pieces – ten pieces cut ½” x 2”, one piece cut tp ¼” x 2” and one piece cut to 3/4” x 5 ¼”.
Accessories:  Adhesive of choice, Stampin’, Cut & Emboss Machine, Scalloped Contours dies, Fresh Freesia 3/8” Open Weave Ribbon, Mini Glue Dots, Stampin’ Dimensionals.
 
Directions:


1.    Use the Stampin’ Cut & Emboss machine to cut the large scallop border dies from the Scalloped Contous dies from the two pieces of 1 ½” x 5 ¼” pieces of Basic White cardstock (you can cut both at once).

2.    Adhere the ½” x 2” pieces of the DSP to the center of one of the 4” x 5 ¼” pieces of Basic White.  Alternate the patterns and end with the ¼” x 2” piece of DSP.

3.    Use Fresh Freesia to stamp the “You’re Absolutely Amazing” sentiment onto the lower right corner of one of the scalloped edge pieces and then adhere both of scalloped borders to the top and bottom of the DSP piece (see the photo for how it will look) Adhere the whole piece to the card front (the fold will be at the top of the card).

4.    Use Memento ink to stamp the large multi-flowered image onto the 2 ½” x 5 ½” piece of Basic White cardstock.  Use Fresh Freesia ink to stamp the coordinating solid image to fill the flowers and use the Light Old Olive Blends marker to color in the leaves of the image

5.    Use the Stampin’ Cut & Emboss machine and the coordinating Scalloped Contours die to cut out the floral image and then adhere it to the card front using Stampin’ Dimensionals.

6.    Tie a bow using the Fresh Freesia 3/8” Open Weave Ribbon and use a Mini Glue Dot to adhere the bow to the card front.

7.    Send to an Absolutely Amazing person!


If you are having problems visualizing these directions, remember you can see them created step-by-step on my Facebook Live from June 20th   HERE.  Enjoy these projects and please share them with a special friend!


Remember, if you would like to purchase any of the supplies to make these cards, just click the “Shop Now” button above to be taken to my Online Store.  Be sure to use the Host Code (also listed above) if your order is under $150 (if your order is over $150 be sure to take advantage of the Host Rewards offered by Stampin’ Up!)


See you on Sunday, June 27th at 2pm on my next Facebook Live!