It’s
the last week of Christmas in July! Next week I will start showing NEW products
from the July - December 2021 Mini Catalog and Sale’A-Bration Catalog. Yes, the title of the Catalog is correct –
Due to Covid 19 there were delays in receiving many of the materials needed for
our products, so rather than have tons of backorders, it was decided to hold
off the launch of the Mini Catalog until August. Stampin’ Up! is always looking out for
us! The following cards were featured on
my Facebook Live on July 25, 2021 and feature the Inspired Thoughts Bundle featured on page 52 of the 2021-2022 Annual
Catalog,
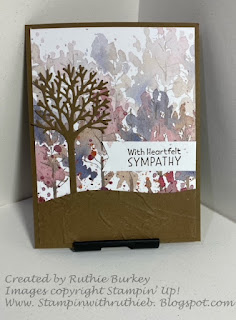
Sympathy Card
Designer Series Paper (DSP): Beauty of the Earth – three pieces; one piece cut to 4” x 5 ¼” , one piece cut to ½” x 4” and one piece cut to ¾” x 3 ½” (see photo for pattern used – the smaller piece is cut from the middle portion of the pattern used.)
1. Use Early Expresso Ink
to stamp the “Sheltering you with Love…..” sentiment onto the top center of the
4” x 5 ¼” piece of Basic White.
2. Adhere the ½” x 4”
piece of DSP to the bottom of the stamped 4” x 5 ¼” piece of Basic White and
then adhere the whole piece to the inside of the card.
3.
Adhere
the 4” x 5 ¼” piece of DSP to the card front.
4. Adhere a 2 ½” x 4”
piece of Adhesive Sheets to the back of the 2 ½” x 4” piece of Soft Suede Cardstock.
5. Use the Stampin’ Cut
& Emboss Machine to cut a portion of the trees from the 2 ½” x 4” piece of Soft
Suede Cardstock,
6. Use the Stampin’ Cut
& Emboss machine and the wavy die from the Inspiring Canopy Dies to cut a
hill shape from the 2” x 4” piece of Soft Suede cardstock then place the cut
piece into the Painted Texture 3D Embossing Folder and run though the Stampin’
Cut and Emboss Machine. Adhere this
piece to the bottom of the card front.
7. Remove the backing of
the Adhesive Sheets from the back of the die cut tree and place it on the left
side of the card with the base of the tree meeting the “hill”.
8. Use Early Espresso Ink
to stamp the “Sympathy” sentiment onto right side of the ¾” x 3 ½” piece of
DSP. Cut a banner end on the left side
using scissors or a punch. Adhere to the
right side of the card front (see photo for placement).
9. Send to someone who is
in need of comfort.
Peace, Joy, Love Card
Shimmery White cardstock - one piece cut to 4” x 5 ¼”
Designer Series Paper (DSP): Beauty of the Earth – two pieces; one piece cut to 4” x 5 ¼” and one piece cut to ¾” x 5 ¼: (see photo for pattern used – NOTE: This is a one way pattern so be sure to cut in a Landscape orientation)
1. Adhere a 4” x 5 ¼”
piece of Adhsesive Sheets to the back of the 4” x 5 ¼” piece of Shimmery White
Cardstock.
2. Use the Stampin’ Cut
& Emboss Machine to cut the large tree dies from the Shimmery White
Cardstock.
3. Remove the backing from
the tree die cut and adhere to the 4” x 5 ¼” piece of DSP
4. Use Versamark ink to
stamp the “Peace, Joy, Love” sentiment between the trunks of the trees (see
photo for placement). Cover the stamped
sentiment with White Embossing Powder (removing excess afterwards) and then
heat with the Heat Tool.
5. Prime the Wink of
Stella by squeezing over a piece of paper towel then “flick” the Wink of Stella
all over the piece of DSP containing the trees, then adhere the piece to the
front of the card base.
6. Use Night of Navy Ink
to stamp the “Wishing you all the Beautiful Gifts….” Sentiment to the top
center of the 4” x 5 ¼” piece of Basic White (remember to place the cardstock
into a landscape orientation before stamping) then adhere the ¾” x 5 ¼” piece
of DSP to the bottom of the stamped Basic White Cardstock.
7. Adhere this whole piece
to the inside of the card.
8. Voila! Another Christmas card done!!!
If
you are having problems visualizing these directions, remember you can see them
created step-by-step on my Facebook Live from July 25th HERE. Enjoy these projects and please share them
with a special friend!
Remember,
if you would like to purchase any of the supplies to make these cards, just
click the “Shop Now” button above to be taken to my Online Store. Be sure to use the Host Code (also listed
above) if your order is under $150 (if your order is over $150 be sure to take
advantage of the Host Rewards offered by Stampin’ Up!)
See
you on Sunday, August 1st at 2pm on my next Facebook Live!


No comments:
Post a Comment
Thank you for leaving comments, they are greatly appreciated!